Wednesday 29 November 2017

Definition of Modern and Contemporary Sculpture
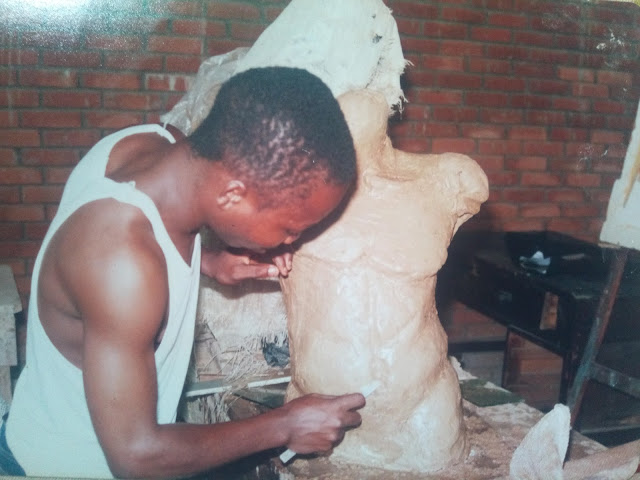
The art of sculpture is no longer restricted by traditional sculptural concepts, materials or methods of production. It is no longer exclusively representational but frequently wholly abstract. Nor is it purely solid and static: it may reference empty space in an important way, and can also be kinetic and capable of movement. Finally, as well as being carved or modelled, it can be assembled, glued, projected (holographically), or constructed in a wide variety of ways. As a result the traditional four-point meaning and definition of sculpture no longer applies.
"Sculpture is the only branch of the visual arts that is specifically concerned with expressive three-dimension form."

Almost any material capable of being shaped in three dimensions can be used in sculpting. But some materials like stone - especially hard limestone (marble) - wood, clay, metal (eg. bronze), ivory and plaster have exceptional "plastic" attributes and have therefore proved most popular to sculptors from prehistoric times onward. As a result, for most of its history, sculpture has been created using four basic methods: stone carving, wood carving, bronze casting and clay firing.


Monday 23 October 2017

HOW TO SHADE WITH POINTILLISM


How to Shade with Pointillism 

Credit: https://learntoart.wordpress.com/2009/08/23/how-to-shade-with-pointillism


pointillism-31
Pointillism or stippling:  is when you use a series of dots to create an image. It takes time, and loads of patience, but the results can be incredibly impressive!
Pointillism is equally one of the technique of shading or painting. This can be achieved either with pencil, pen, paint etc.

In the case of pen usage, the best ones are fine tip pens with free-flowing ink. Ball point pens won’t work very well because they need to be moving for the ball to refresh the ink. I’ve used Staedtler Pigment Liners. You’ll also want a range of sizes as well. Something like an 01, an 03, and an 05 would work well.

You want to make sure the dots of the different sized pen are blended together. You don’t want to see the border where you switched pens. Also, don’t rush your mark-making. If you get careless, some of your points might get little tails. You want nice clean dots to create an even surface.

As with any drawing, you want to start out with a good line drawing. Outline the contours of your subjects, as well as the shapes of the major shadows and highlights. You want to have good guidelines for when it comes to filling in the values.
When using pointillism to shade, you need to think about values just like you do when shading with a pencil.
pointillism-value-scale1
Around the highlights, use your finest pen and make the dots far apart. Avoid putting any dots inside the highlight area, but make sure that the points gradually become more and more farther apart closer to the highlight. You don’t want your marks to suddenly stop dead.
pointillism-11
As the highlight fades to the midtones, switch to the middle-sized pen and mark your points closer together.
pointillism-21
For the shadows, use the fatter pena nd make your marks close together. In the darkest areas, your dots may be so close together that no paper shows through. You might be tempted to  cheat and use the pen to shade in the entire shadow.
Try to resist!
It would be faster, but it would be obvious. With pointillism, it’s important to draw everything using only dots. The marks create a pattern or a texture that is visibile even in the solid black areas. If you have a really large area of black that would take you days to dot, you could try colouring it in solid, then adding a few dots on top to mimic the pattern.
pointillism-31
Also, don’t draw any lines! Even if there are wrinkles or eyelashes, don’t draw a line. Use a series of points to create the line and it will look more natural. A solid line will be a distraction in amongst all those dots.
When your drawing is done, let the ink dry for ten minutes or so before erasing the pencil lines. You’d hate to smudge all your hard work!

Pointillism in Colour:

You can also use pointillism with paints or pastels. You do this by layering different colour dots on top of each other. When seen from far away, the dots blend together and create a different colour. A simple example of this would be dots of red and yellow, which would appear as orange from far away. This type of illusion was used extensively by Seurat.
This example from Wikipedia is A Sunday on La Grande Jatte, by Seurat.

Sunday 15 October 2017

HOW TO PAINT WITH ACRYLIC-For Beginners

NOTE: The Art Piece is one of my Paintings.


How to Paint With Acrylics;


To start an acrylic painting you need basically two things:
- Painting supplies
- Ideas for what to paint


Acrylic painting for beginners-
all you need to know to get started- The content of this article is copyrighted

by Robie Benve | Source


Acrylic Painting Supplies

Gather your painting supplies in a well-lit area.

You’ll need:


Acrylic Paint: Get the best quality paint you can afford. Aim for artist quality, not student quality. The student quality hues have more fillers, and respond less efficiently to color and media mixing.

You don’t need many colors; a limited palette of basic colors is great for starters. To begin with a very limited palette, you can buy single tubes and make your own primary color combination.If you want a pre-made set, the Liquitex 4 Color Mixing set It has a good choice of tubes: Quinacridone Crimson, Yellow Medium Azo, Phthalo Blue (Green Shade), and Titanium White. - more details below. Black can always be obtained by mixing the three primary colors together.
Brushes of different shapes and sizes. The rule of thumb for brushes is to use big brushes for big areas and loose painting style, and use small brushes for small areas and details.


Painting support : canvas, paper, board, etc. Acrylic paint works on many kinds of surfaces. If you buy pre-primed canvas, make sure it’s primed with acrylic gesso.

A canvas primed for oil painting is not suitable. Acrylics don’t stick on oily surfaces, and would peel off with time.
Water. Get a big jug of water to rinse the brushes when you switch from one color to another. Better yet, you should have two containers of water: one to rinse brushes from the paint, and one with clean water to use to dilute paint and moisten brushes when needed.
Cloth rag or paper towel. To dab brushes after rinsing, correct mistakes, etc.


Easel: It’s beneficial to keep your support at an angle that is quite perpendicular to your vision. This helps a lot with perspective and proportions. To keep your canvas or board inclined, you can use a stand up easel or a table top one. Easels come in different shapes and prices

Thursday 5 October 2017

LEARNING HOW TO DRAW WITH CHARCOAL PENCIL

Note; Above are works of my students not professional works

Drawing using Charcoal Pencil:

With the aid of charcoal pencil, begin by rendering the major shapes in the still life. Begin with large shapes, asking yourself "comparison" questions as you draw the components of the still life. Is this item bigger or smaller than the first item you have drawn - is it higher or lower on the picture plane - is this item round, angular, tall, short, skinny - the questions can be numerous and each one will help you make an accurate drawing. Do not get bogged down in detail - just try to capture the major shapes, sizes and spatial relationships between the objects. If you make a "mistake" in your drawing at this point, do not erase, but rather redraw the lines so that you are more satisfied with them.
Once you have the still life drawn to your satisfaction, it is time to begin to define the highlights and shadows you see in the arrangement. As you toned your paper in the earlier step, you were creating the medium gray value for the still life. Now you will turn your attention to any value that deviates from this medium gray. This will apply to both areas that are darker than the medium gray and to areas that are lighter. The darker areas will be rendered with application of the black charcoal. The charcoal will be applied in heavier amounts where the still life is darkest and with less pressure and charcoal in areas that are lighter than those darkest parts. To achieve a gradual transition from lighter to darker areas, you can use your blending stumps to soften the transition areas. I must interject here that you must resist the urge to blend the charcoal with your fingers. Our hands have oils that naturally occur in our skin. By using your fingers to blend the charcoal you are rubbing these oils into your drawing. While it will usually not be apparent initially, over time those oils will begin to show in the drawing and compromise the long-term quality of your drawing.
The next step is to indicate where the light is striking the objects in the still life. These areas will be lighter than the medium gray your toned paper provides. To create these highlights you will be using your eraser to lift some of the charcoal back out of the toned paper. You will see that you can remove most, but not all, of the charcoal. It's fun and unexpected to use an eraser as a drawing tool, and in this project it is a very effective one. Experiment with the eraser and the pressure you apply to lift the charcoal. A myriad of effects can be achieved by using the eraser in different ways. The beauty of the kneaded eraser is that you can shape it into all kinds of edges, points, etc. to vary the effects in lifting the charcoal from the toned paper. For the lightest lights in the drawing you will need to apply some of the white charcoal. As mentioned earlier, these light areas can be blended with the tortillions - just make sure that the blending stump is clean before you attempt this light area blending. The tortillions can be cleaned by rubbing the dirty parts off with sandpaper.
While I have described the creation of light and shadow on the still life drawing in terms of "steps," you do not have to do all of the shading first and the highlighting second. In fact, you can go from one to the other interchangeably I tend to work from dark to light on this type of project, but by no means do you have to. As your drawing progresses, occasionally step back from the picture and consider the image as a whole. When you are satisfied with your drawing - when you feel good about the variety of lights and darks portrayed, when the drawing looks "finished," it is time to stop. Many artists have the problem of overworking their creations and thereby lessening the quality and spontaneity of their piece. Knowing when to quit is one of the most overlooked skills in the artist's repertoire

Materials Checklist;

*Charcoal
*Eraser
*White Charcoal
*Charcoal Paper
*Facial Tissues (Kleenex)
*Blending Stumps (Tortillions)
*Fixative
*Creating the Toned Paper


Sunday 1 October 2017

DRAWING (Focus on Human Face)

Drawing is the use of line to describe or represent an object/image on a surface which could be;
*Still life
*Life/Figure
*Nature
*Landscape
*Imaginative etc

To learn the basics on how to draw Human face under figure drawing, click on the link below.

Credits to; https://m.youtube.com/watch?v=dbRMCgtcchw

PATTERN DESIGN WITH PHOTOSHOP

Pattern design is a repeated  motif on a surface and this can be achieved with the aid of motif. Motif however is a unit of design, which develop into pattern when it is repeated. Pattern design can be in block repeat, halfdrop repeat, Mirror repeat, Simple repeat, Block repeat etc.
This design are seen on surfaces like wallpaper, carpet, fabric etc.

Below is a link to a video on how pattern can be done using Photoshop.
https://m.youtube.com/watch?v=rua9Cml_oTQ

Sunday 24 September 2017

LETTERING

Lettering graphic design and typography, lettering refers to the creation of hand-drawn letters to apply to an object or surface.[1][2][3][4]
In art,
Lettering includes calligraphy and lettering for purposes such as blueprints and comic books, as well as decorative lettering such assign painting and creating custom lettering graphics, for instance on posters, for aletterhead or business wordmarklettering in stone or graffiti.[5] Lettering may be drawn or applied using stencils.[6][7]

Brush lettering practice by artist Emmanuel Sevilla.
In the past, almost all decorative lettering other than that on paper was created as custom or hand-painted lettering; the use of fonts in place of lettering has increased due to new printing methods and phototypesettingand digital typesetting, which allow fonts to be printed at any desired

HISTORY OF CAVE PAINTINGS/PARIETAL ART

Cueva de las Manos located Perito Moreno,Argentina. The art in the cave dates between 13,000-9,000 BP
Cave paintings (also known as "parietal art") are painted drawings on cave walls or ceilings, mainly of prehistoric origin, dated to some 40,000 years ago (around 38,000 BCE) in Eurasia. The exact purpose of thePaleolithic cave paintings is not known. Evidence suggests that they were not merely decorations of living areas since the caves in which they have been found do not have signs of ongoing habitation. They are also often located in areas of caves that are not easily accessible. Some theories hold that cave paintings may have been a way of communicating with others, while other theories ascribe a religious or ceremonial purpose to them. The paintings are remarkably similar around the world, with animals being common subjects that give the most impressive images. Humans mainly appear as images of hands, mostly hand stencils made by blowing pigment on a hand held to the wall.
The earliest known cave paintings/drawings of animals are at least 35,000 years old and were found in caves in the district of Maros, located in Bantimurung district, South Sulawesi, Indonesia, according to datings announced in 2014. Previously it was believed that the earliest paintings were in Europe.[1]The earliest figurative paintings in Europe date back to the Aurignacian period, approximately 30,000 to 32,000 years ago, and are found in the Chauvet Cave in France, and in the Coliboaia Cave in Romania.[2] The earliest non-figurative rock art dates back to approximately 40,000 years ago, the date given both to a disk in the El Castillo cave and a hand stencil in Timpuseng cave Sulawesi, Indonesia. There are similar later paintings in Africa, Australia and South America, continuing until recent times in some places, though there is a worldwide tendency for open air rock art to succeed paintings deep in caves.

Saturday 29 July 2017

WOOL COLLAGE

Collage (from the French: coller, "to glue" French pronunciation: ​[kÉ”.laÊ’]) is a technique of an art production, primarily used in the visual arts, where the artwork is made from an assemblage of different forms, thus creating a new whole.
A collage may sometimes include magazine and newspaper clippings, ribbons, paint, bits of coloured or handmade papers, portions of other artwork or texts, photographs and other found objects, glued to a piece of paper or canvas. The origins of collage can be traced back hundreds of years, but this technique made a dramatic reappearance in the early 20th century as an art form of novelty.
The term collage was coined by both Georges Braque and Pablo Picasso in the beginning of the 20th century when collage became a distinctive part of modern art.

However, Collage work can also be achieved with the aid of knitting wool. This work can therefore be called 'WOOL COLLAGE'. The technique used to create object on a surface using wool of different colours. Objects like nature, still, life etc can be achieved using this technique.

Note: The works you see on this page are carried out by my Key Stage 3 learners.

MIXED MEDIA

Art is about EXPRESSING ones feelings in written or visual form. It tolerates self expression. 
However, Self-expression the expression of your thoughts or feelings especially through artistic activities (such as painting, writing, dancing, etc) 
The Artwork here is a typical example of self expression whereby, combination of strips of newspapers, strawboard, chalk pastel and acrylic paint are used to carryout the art piece.
Inotherwords, this art piece can be termed a MIXED MEDIA PAINTING

Tuesday 18 July 2017

MIXED MEDIA PAINTING

Mixed media painting  was carried out using the following media:

- Acrylic paint

- Ankara fabric

- Chalk pastel

- Strawboard

- Adhesive (evostic)

Size: 12'' x 21" inches

Artist: Abiola M. Samson

Year of Production: 2017


Mixed media painting is one which combines different painting and drawing materials and methods, rather than only one medium. Any material can be used, including collage items such as pages from magazines, newspaper, photographs, fabric, soil, or packaging. However, mixed media piece can also be as 'simple' as using two media, such as acrylic paints with pastel on top.

Mixed media isn't a 20th-century phenomenon, although in previous centuries artists were less experimental in what they used. For example, gold leaf was often added to church paintings; Leonardo da Vinci mixed pastels with other drawing media; William Blake used watercolor washes to his prints; Edgar Degas combined pastels with charcoal and printing inks.

Tuesday 23 May 2017

MY LEARNERS WORKING ON MURAL DESIGN

The image depicts some of my learners creating pattern on a surface to form a mural design.

However, the word Mural originates from the Latin word “murus”, meaning “Wall" . A mural is any piece of artwork painted or applied directly on a wall, ceiling or other permanent surface. A distinguishing characteristic of mural painting is that the architectural elements of the given space are harmoniously incorporated into the picture.

Some wall paintings are painted on large canvases, which are then attached to the wall (e.g., with marouflage). Whether these works can be accurately called "murals" is a subject of some controversy in the art world, but the technique has been in common use since the late 19th century.


YOUNG POTTERS


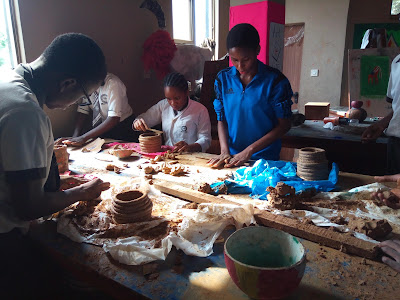
Coiling is a method of creating pottery. It has been used to shape clay into vessels for many thousands of years. It ranges from Africa to Greece and from China to New Mexico. They have used this method in a variety of ways. Using the coiling technique, it is possible to build thicker or taller walled vessels, which may not have been possible using earlier methods. The technique permits control of the walls as they are built up and allows building on top of the walls to make the vessel look bigger and bulge outward or narrow inward with less danger of collapsing. There are many ways to build ceramic objects using the coiling technique. To do this, the potter takes a pliable material (usually clay) then rolls it until it forms a long roll. Then, by placing one coil on top of another, different shapes can be formed.
One of the methods used in terra-cotta sculpture; the clay is rolled into cylindrical strips about the size of an ordinary pencil and wound up to create the desired shape.

ARTISTIC FRAMES FOR HOME/OFFICE DECOR


Monday 3 April 2017

XMABOL KREATIONZ SERVIICES


IDEAS......

Ideas are like rabbits.
You get a couple and learn how to handle them,
and pretty soon you have a dozen.
 ….John Steinbeck

Ideas are like rabbits. You get a couple and learn how to handle them, and pretty soon you have a dozen. John Steinbeck
Read more at: https://www.brainyquote.com/quotes/authors/j/john_steinbeck.html
Ideas are like rabbits. You get a couple and learn how to handle them, and pretty soon you have a dozen. John Steinbeck
Read more at: https://www.brainyquote.com/quotes/authors/j/john_steinbeck.html
Ideas are like rabbits. You get a couple and learn how to handle them, and pretty soon you have a dozen. John Steinbeck
Read more at: https://www.brainyquote.com/quotes/authors/j/john_steinbeck.html
Ideas are like rabbits. You get a couple and learn how to handle them, and pretty soon you have a dozen. John Steinbeck
Read more at: https://www.brainyquote.com/quotes/authors/j/john_steinbeck.html